
# SECTION 15: Interior Capture Workflow — Step by Step
# Step 1: Open the Assigned Claim Task List
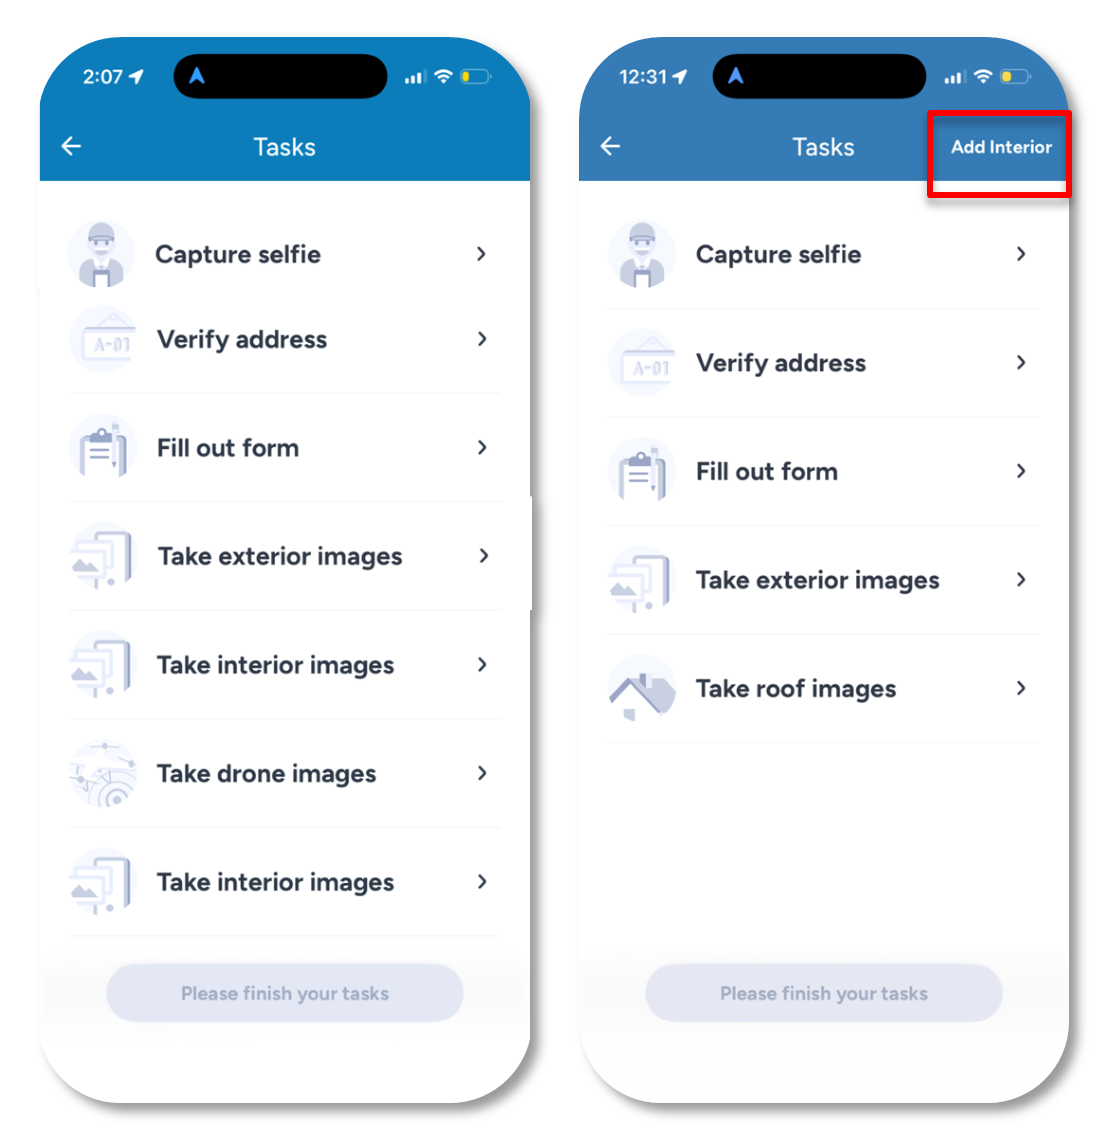
Task list — interior already included · Task list — Add Interior (top-right)
Start from the Assigned Claim
- Begin from your assigned claim and open the task list for that claim.
- The task list shows all work required for the claim.
- Hover-related interior image tasks are found within the claim task list.
- Once the interior task is added (through the Ops questionnaire or on site), work from the Interior Task section of the inspection form.
If Interior Is Not Yet in the Task List
- Select the Add Interior button in the top-right corner of the task list.
- The interior task is added to the list immediately.
- Once added, proceed with the Interior Task workflow as normal.
# Step 2: Select the Interior Image Task
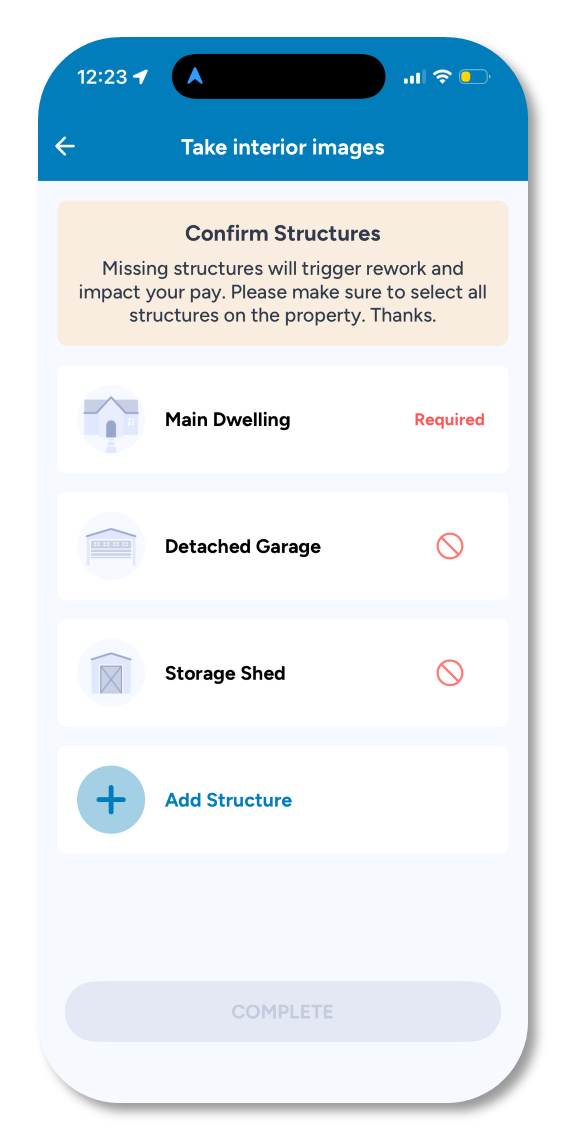
Interior Task / Interiors Form
Select Take Interior Images
- From the claim task list, select Take Interior Images.
- This opens the interior image capture workflow — the Interiors Form.
- The Interiors Form is the main workspace for interior image collection.
# Step 3: Main Dwelling Is Always Required
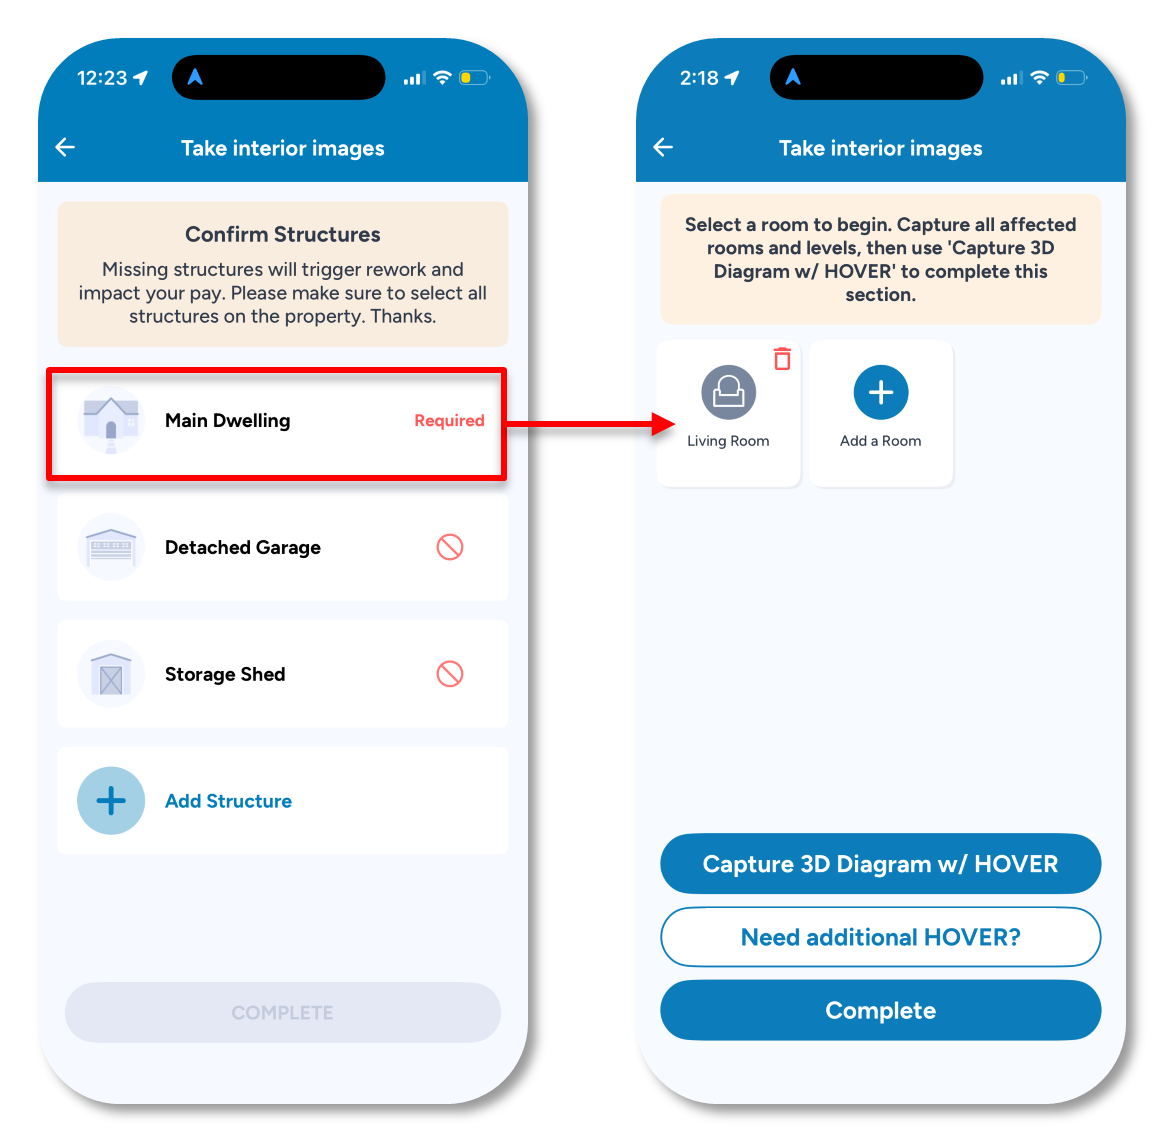
Interiors Form — structures · Main Dwelling section
Complete Main Dwelling First
- Once in the Interior Task section, the Main Dwelling is required.
- Complete the Main Dwelling interior workflow before adding any other structures.
- Additional structures may be added after the Main Dwelling:
- Detached garage
- Barn
- Shed
- Other structures present on the property
Skipping a Structure
- Select the red circle/cross icon next to a structure to skip it.
- Skipped structures are saved below the + Structure button and shown in gray.
- To re-add a skipped structure, tap the grayed-out structure name.
# Step 4: Complete Room-Level Captures
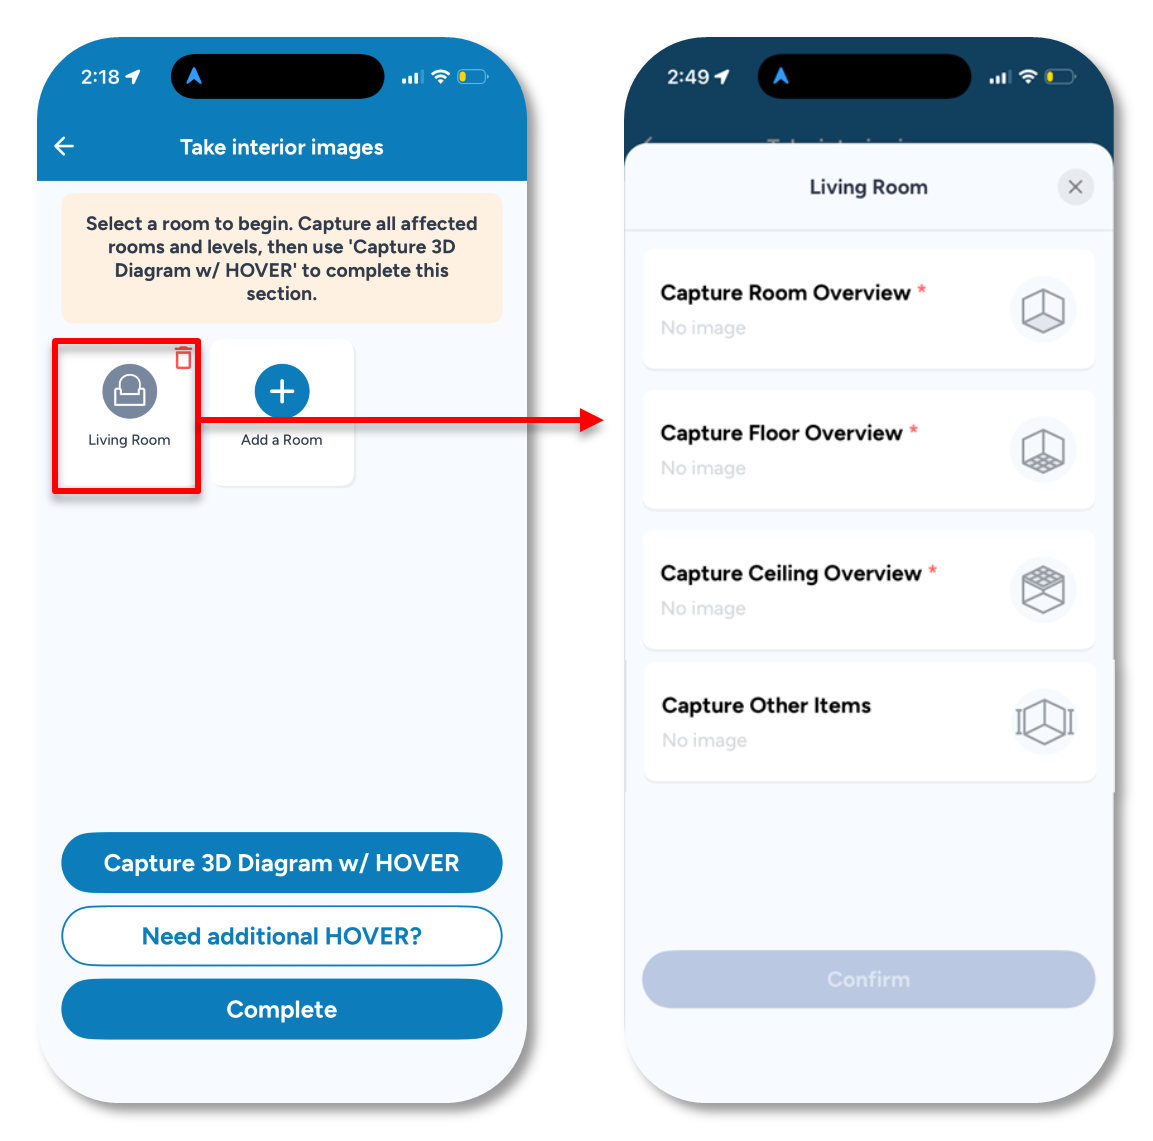
Structure / room screen · Room-level capture requirements
Work Room by Room — Complete Required Captures
- Click the room to begin the capture process.
- Capture only the affected rooms — the rooms the insured has identified as damaged. You do not need to start with the living room unless it is one of them.
- For each room, complete the required captures shown in the app:
- Room Overview
- Floor Overview
- Ceiling Overview
- Any additional items prompted by the app
# Step 5: Adding a Room
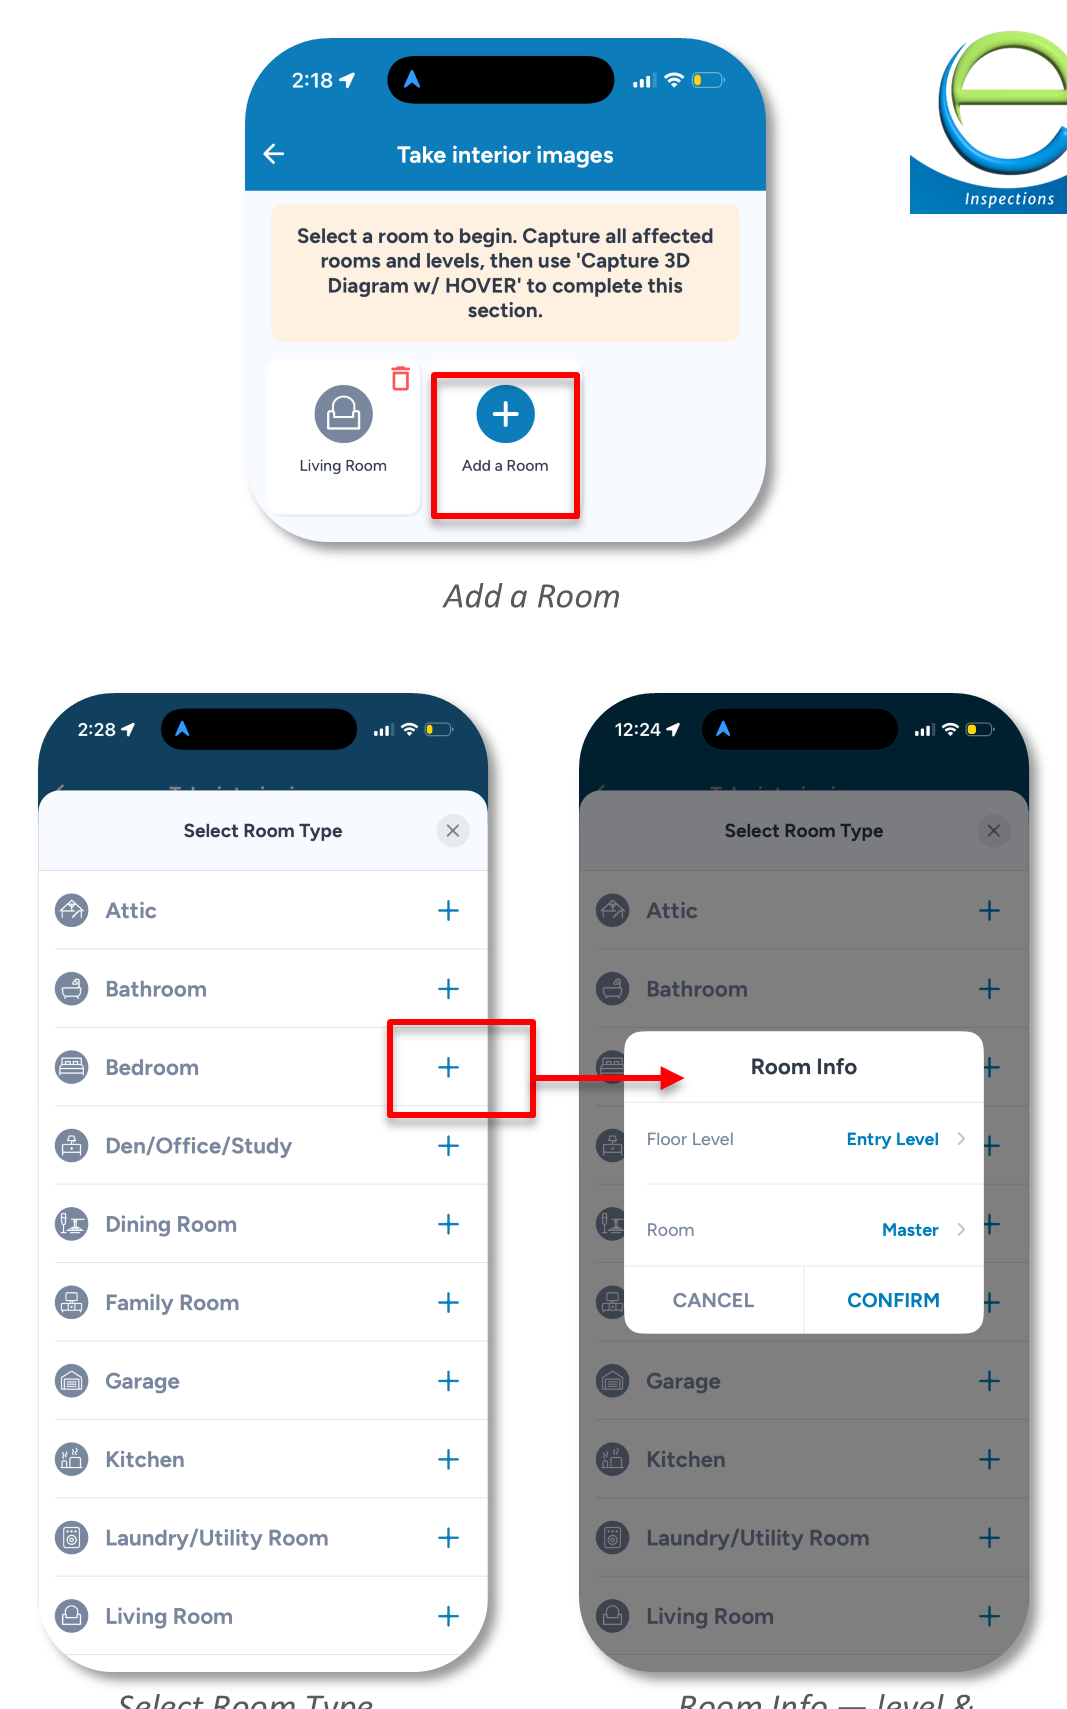
Add a Room · Select Room Type · Room Info — level & room
Add a Room If Needed
- If a room needs to be added, select Add a Room from the Interior Task screen.
- Choose the room type from the available list.
For Bedrooms and Bathrooms — Room Info Screen
- Select the floor level for the room.
- Select the room or room number.
- Tap Confirm.
Note: The room option may include "Master." For bathrooms, "Master" refers to the bathroom associated with the master bedroom.
Level Selection — Bedrooms and Bathrooms Only
Level selection only applies when adding bathrooms or bedrooms. For other room types, the app may not ask for a level.
# Step 6: Capture the 3D Diagram with Hover
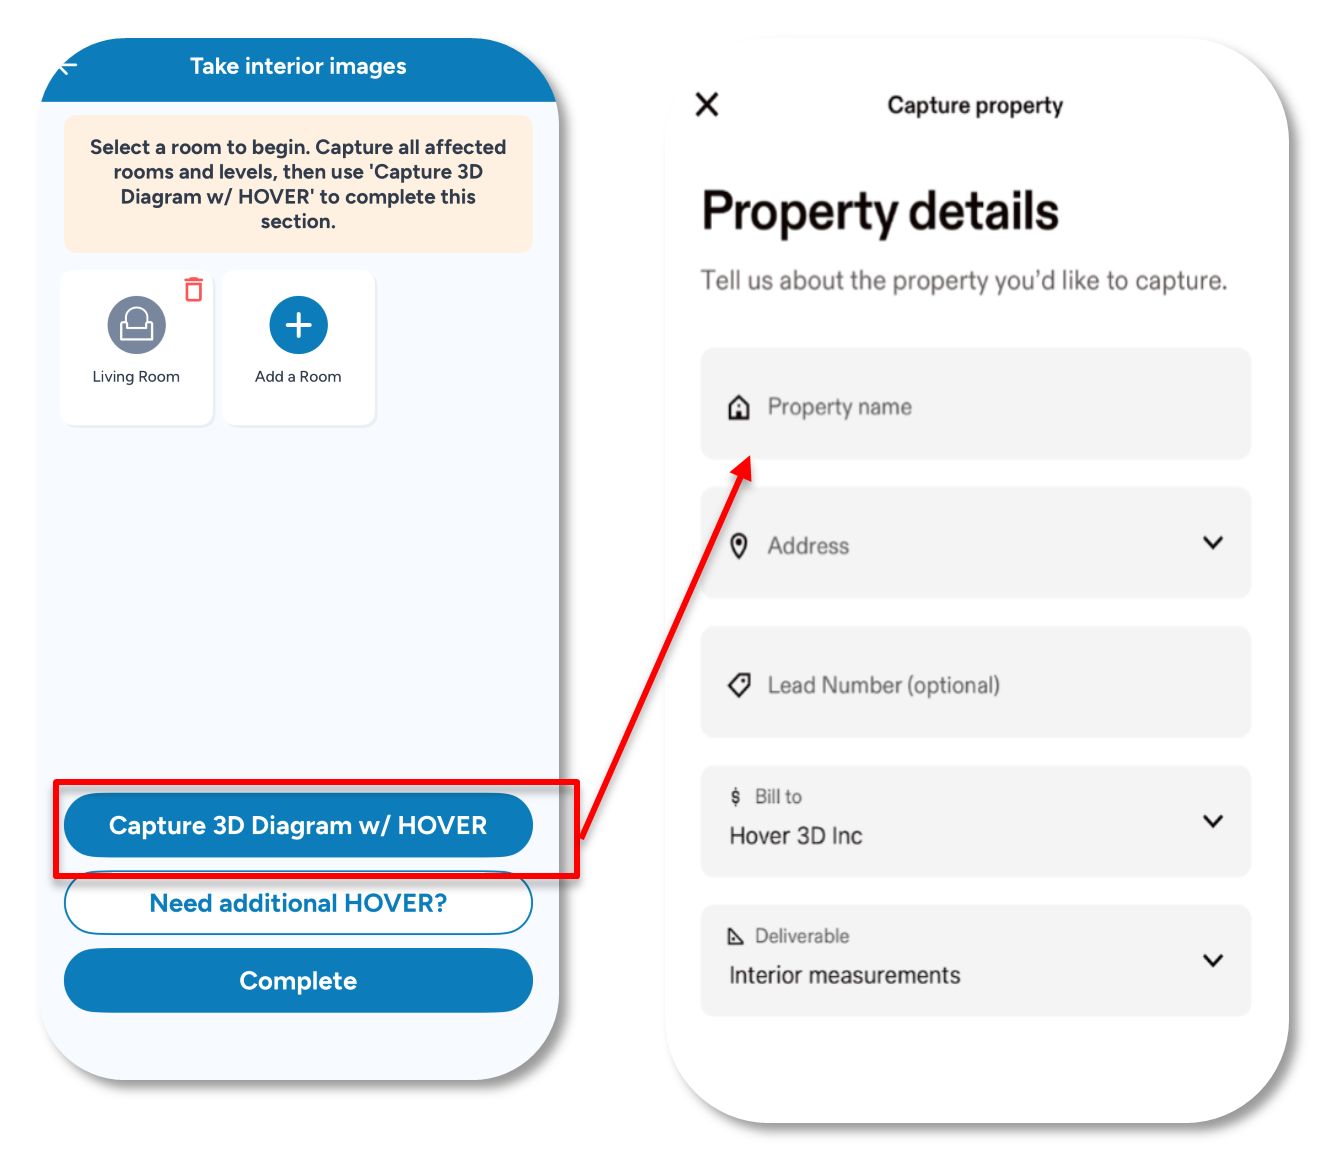
Capture 3D Diagram with Hover — Hover app
Capture After All Affected Room Captures
- After completing the affected room captures, capture the 3D Diagram with Hover for the applicable structure.
- Select Capture 3D Diagram with Hover to open or route to the Hover app and complete the 3D diagram capture.
- The Hover capture must be completed separately for each level of the structure.
- Follow the prompts in the Hover app to complete each level capture.
Important
Complete all required room captures within the structure before selecting Capture 3D Diagram with Hover. If a level has two or more affected rooms, all must be captured first — skipping rooms may cause incomplete data and rework.
# Hover Must Be Completed for Each Level
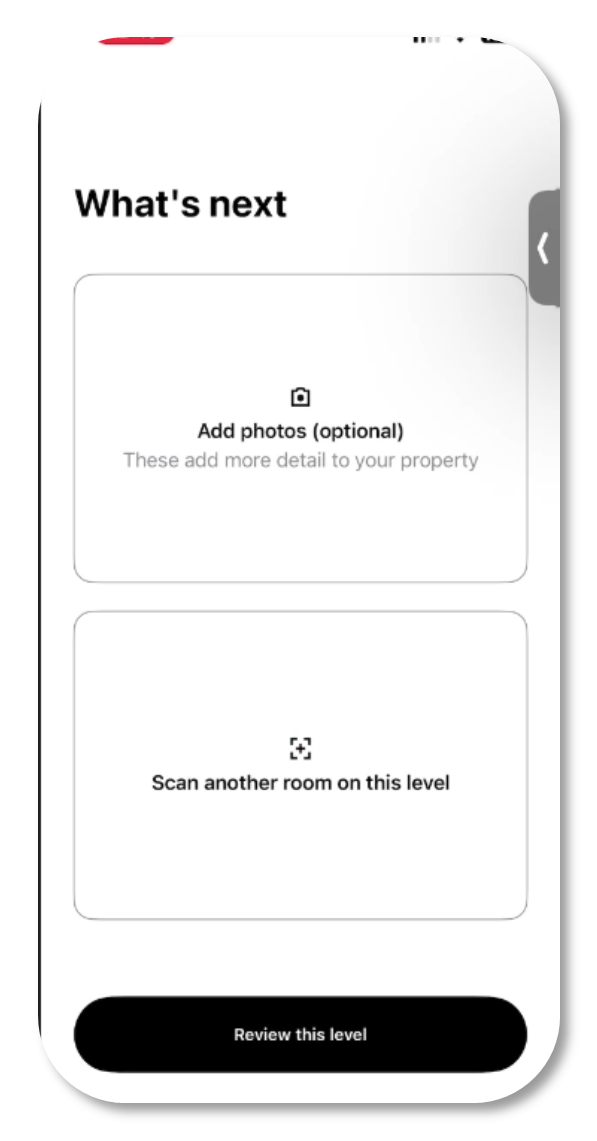
Hover prompt — add photos optional
Complete Hover for Each Applicable Level
- The Hover 3D diagram capture must be completed for each applicable level before the interior task is completed.
- Follow the in-app prompts to complete the Hover capture for each level.
- If a level has two or more rooms, all rooms on that level must be captured in Hover before you add another level or submit your assignment.
Do Not Add Photos in Hover
When prompted in Hover to add photos, there is no need to upload or add photos directly in Hover. Photos should be captured within the Eberl Inspections app for each room.
# Incomplete Rooms Warning
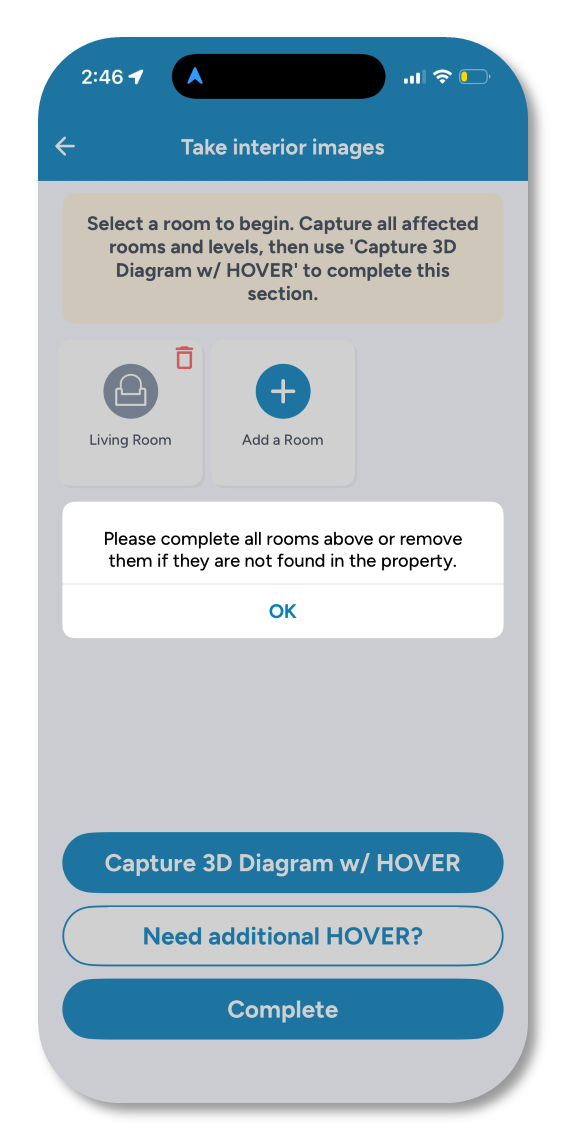
Incomplete rooms warning pop-up
Incomplete Rooms Warning
- The app displays a warning if you try to complete the workflow before all required rooms are completed or removed.
What To Do
- Required rooms must be completed before finalizing.
- If the room exists on the property — complete all required captures for that room.
- If the room is not found on the property — remove it from the list if the app allows.
- The form cannot be completed until all listed rooms are either completed or removed.
If the interior does not apply
- The interior task cannot be removed once it has been added. Check out and select the reason the section was not completed.
What the Warning Says
"Please complete all rooms above or remove them if they are not found on the property."
# Adding Other Structures
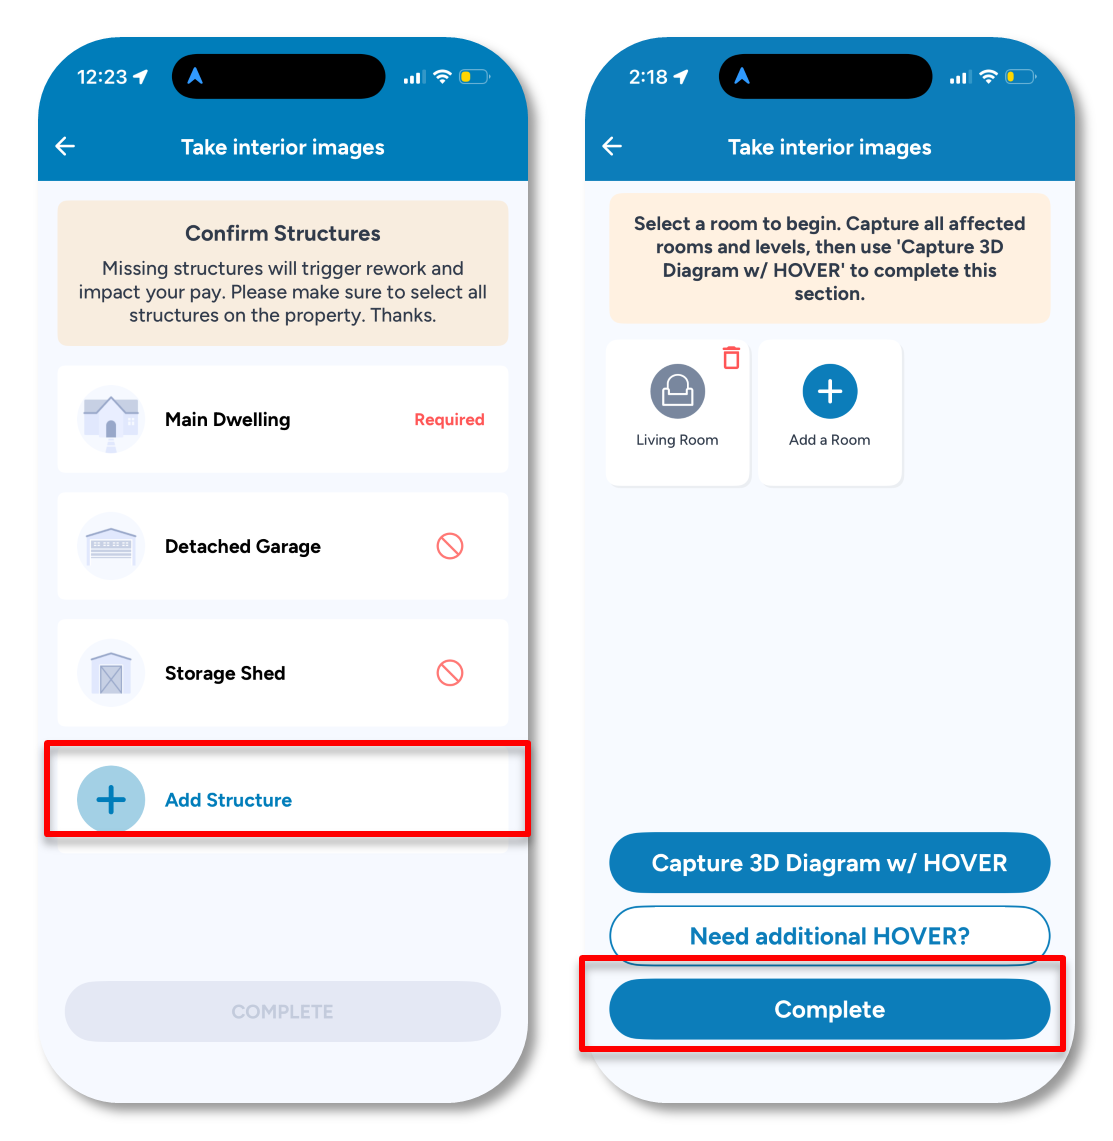
Add Structure screen · Structure screen & Complete
Add Other Structures After the Main Dwelling
- After completing the Main Dwelling interior workflow, you can add other structures if needed.
- Other structures may include:
- Detached garage
- Storage shed
- Barn
- Additional dwelling on site
- Other structures present on the property
Finalize
- After completing all required structures, rooms, captures, and Hover captures, tap Complete to finalize the Interiors form.
# Hover Project Naming – Best Practice
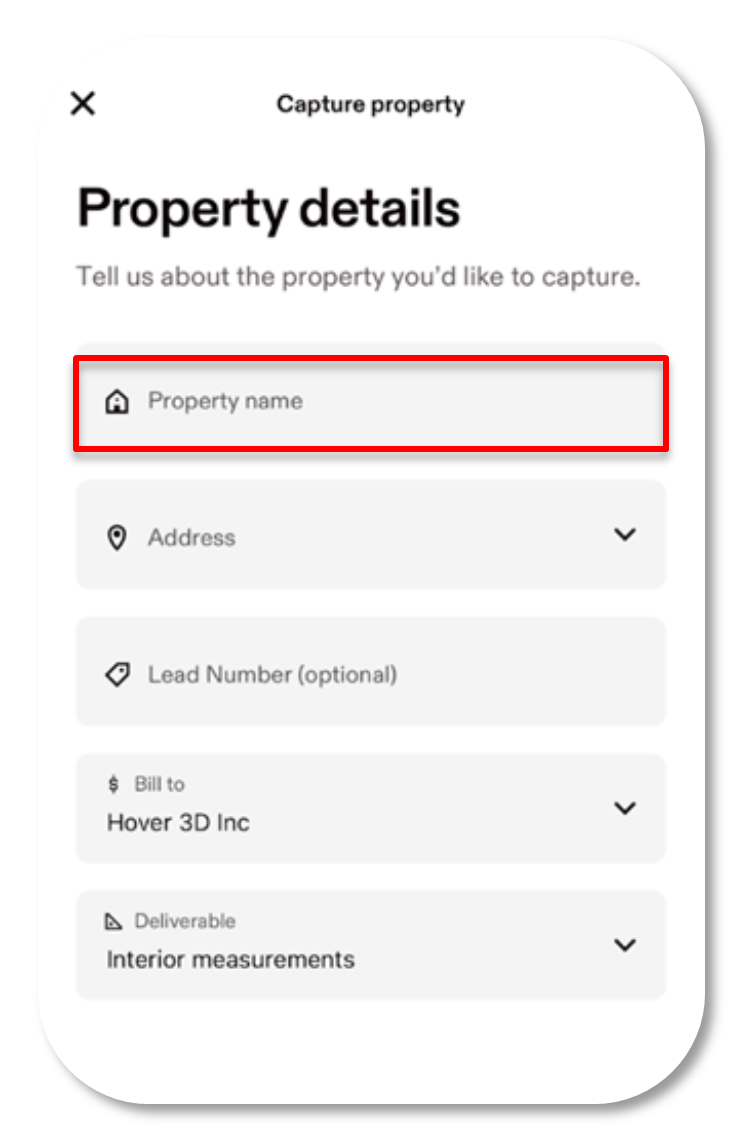
Hover project naming / editing
Name Your Hover Project
- When routed into Hover, the property name may be editable.
- Recommended: rename the Hover project to clearly identify the structure and level being captured.
- Naming examples:
- "Main Dwelling – Level 1"
- "Main Dwelling – Level 2"
- "Detached Garage"
- "Storage Shed"
Tip
Especially important when more than one structure or level is involved. Good naming helps you and your team tell projects apart at a glance.
# Scanning Multiple Levels Within a Structure
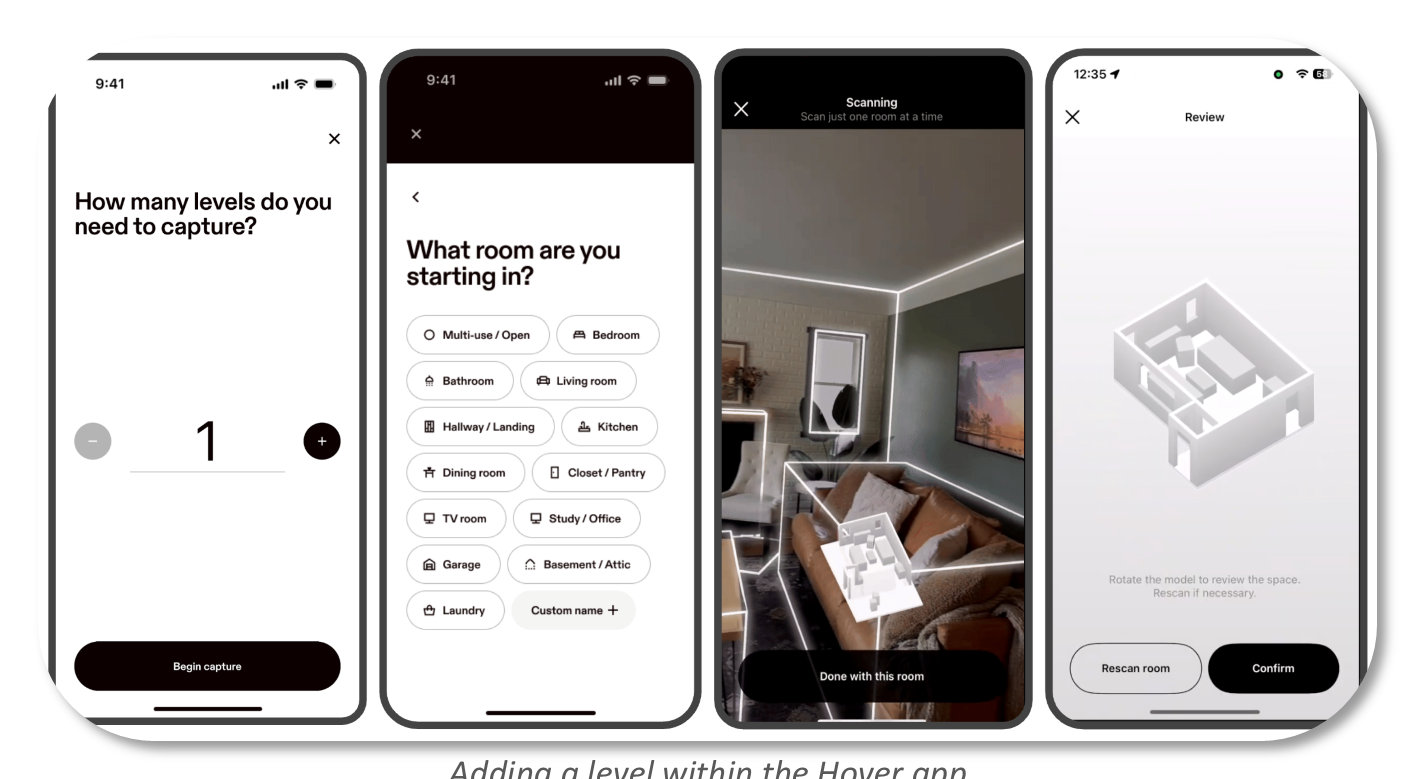
Adding a level within the Hover app
Use Hover's Level Feature
- Hover has a built-in level feature. Use it first when a structure has rooms on more than one level.
- After scanning the first level, use Hover's built-in option to add a level before submitting.
- There is no two-level limit — three or more levels can be added as needed.
- Add all required levels within the same Hover project before submitting.
Best Practice
- Capture all affected rooms in the Eberl app first (all levels).
- Then launch Hover and use the level feature to complete all levels in one project.
Validated
Hover allows 3+ levels. Add all levels inside Hover before submitting — this keeps all level scans in one organized job.
# "Need Additional Hover" – When to Use It
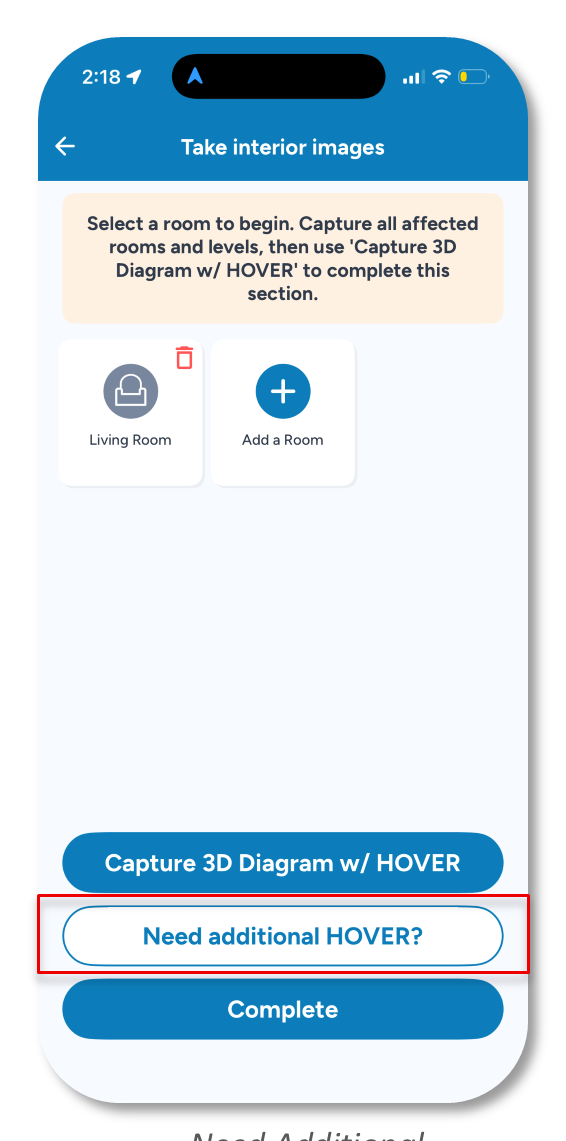
Need Additional Hover — enabled after first capture
Backup Option Only
- One Hover job per structure is the design. Add every level you need inside that job — this button is the backup for when you no longer can.
When To Use It
- You have already submitted the Hover job for a structure, and another level still needs capturing.
- This button creates a second Hover job for that same structure.
How It Works
- Submitting a Hover job closes it: you cannot add a level to a job you have already submitted. That is what this is for.
- Can be used once per structure (unavailable after use).
- Name it clearly, e.g. "Main Dwelling – Level 3".
Last Resort
Complete the first Hover project as fully as possible before submitting, and add all levels in Hover first. "Need Additional Hover" is a last resort.
Need a third job for one structure? The button is available once per structure. Reach the operations group any of three ways: call the support line listed in the app, use the Support chat under the inspection, or email e360support@eberls.com.
# Hover Troubleshooting and Tips
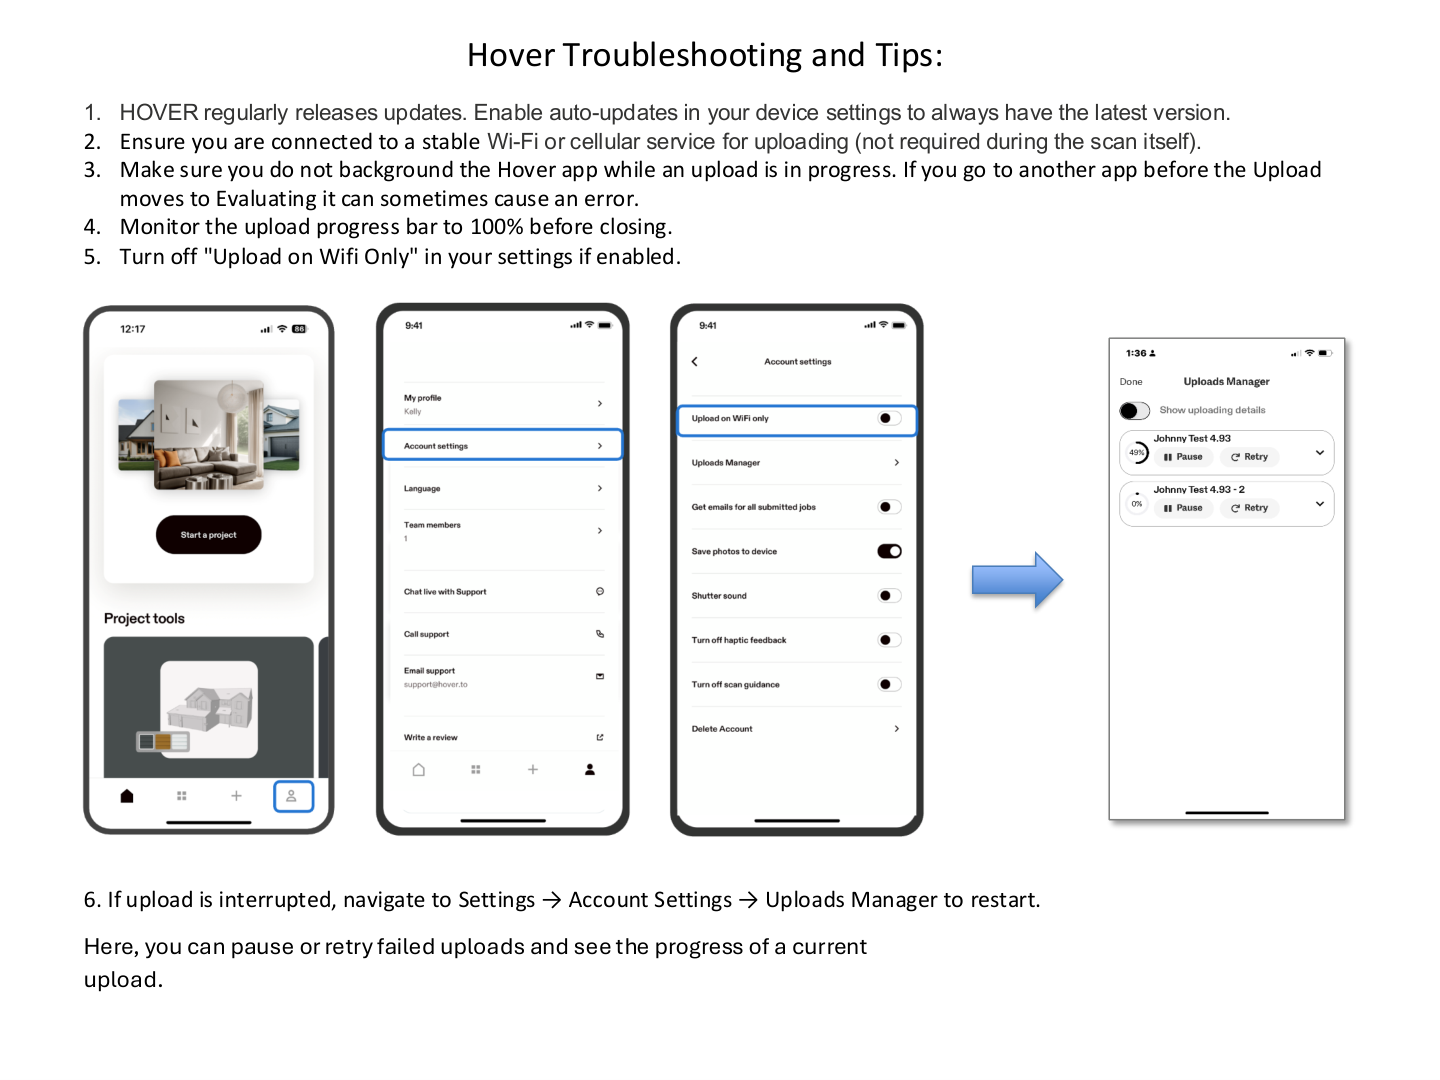
- HOVER regularly releases updates. Enable auto-updates in your device settings to always have the latest version.
- Ensure you are connected to a stable Wi-Fi or cellular service for uploading (not required during the scan itself).
- Make sure you do not background the Hover app while an upload is in progress. If you go to another app before the Upload moves to Evaluating it can sometimes cause an error.
- Monitor the upload progress bar to 100% before closing.
- Turn off "Upload on Wifi Only" in your settings if enabled.
- If upload is interrupted, navigate to Settings → Account Settings → Uploads Manager to restart. Here, you can pause or retry failed uploads and see the progress of a current upload.